Integrate Google Blockly with Angular
Google Blockly is a web-based visual programming editor packaged as a JS library. The project is hosted on github here and its implementation documentation is hosted here. This blog will demonstrate how to integrate it with your angular application. Most of the steps are similar to integrating any JS library with an angular application. I have also have a sample project with this integration on github here. Demo of this project is hosted here.
Steps for integrating google blockly with angular –
- Include the blockly files in the angular project
- Declare a div for blockly and toolbar xml
- Declare Blockly variable and use it to inject blockly into the DOM
1. Include the blockly files in the angular project
Similar to integrating any javascript library with angular, we need to include the blockly JS files in the project and add references to them in angular.json file. We can either clone the blockly repo and take the required files from the project, or we can use npm to install the project into node_modules as mentioned here and link the files from there.
Command to install blockly with npm –
npm install git://github.com/google/blockly.git#1.20190419.0Next we can link the blockly files in angular.json file in scripts section. We either use the minified version or the non-minified version of the files. I am including the minified files – blockly_compressed.js and blocks_compressed.js. In addition to this we need to include the language file for the string – msg/js/en.js. If we are going to generate the block program into any other language, then the language generator (eg – javascript_compressed.js) file also needs to be included. Also if we have any custom blocks, then their JS files also need to be included.
Below is the snippet of my angular.json file –
…
 "scripts": [
               "node_modules/blockly/blockly_compressed.js",
               "node_modules/blockly/blocks_compressed.js",
               "node_modules/blockly/msg/js/en.js",
               "src/assets/blockly/custom_blocks.js"
             ]
 …
2. Declare a div for blockly and toolbar xml
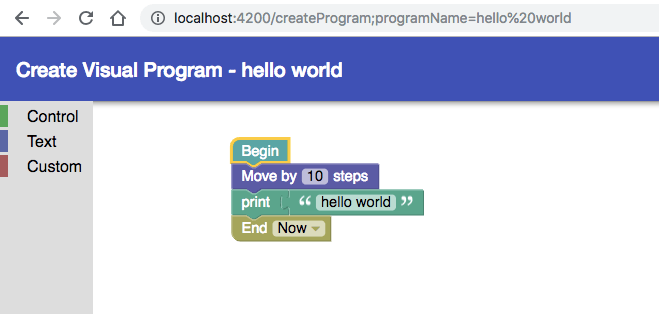
Declare an empty div in component template and assign it an ID. Blockly will be injected inside this div.
Next declare the toolbar configuration as hidden xml tags inside the component template. These new tags will not be recognised by angular and it will throw errors. So we will need to import NO_ERRORS_SCHEMA in the module which hosts this component.
If you do not want to use NO_ERRORS_SCHEMA, then alternatively the toolbar config can be declared as a xml string inside the component class and it can be used for the toolbar config.
Below is my component template –
...
<div id="blocklyDiv" style="width: 100%; height: 100%"></div>
      <xml id="toolbox" style="display: none">
        <category name="Control" colour="120">
          <block type="controls_if"></block>
          <block type="controls_repeat_ext" disabled="true"></block>
        </category>
        <category name="Text" colour="230">
          <block type="text"></block>
          <block type="text_print"></block>
        </category>
        <category name="Custom" colour="360">
          <block type="begin"></block>
          <block type="move"></block>
          <block type="end"></block>
        </category>
      </xml>
...
3. Declare Blockly variable and use it to inject blockly into the DOM
Declare a variable called Blockly of type any on top of the component TS file as below –
...
declare var Blockly: any;
...
Use this variable to inject blockly onto the DOM as below –
...
this.workspace = Blockly.inject('blocklyDiv', {
      toolbox: document.getElementById('toolbox'),
      scrollbars: false
    });
...
With this Blockly object, you will be able to access the library in the TS file. These are the steps for integrating google blockly with angular web app.
Also note that these steps will work for integrating scratch-blocks with angular. Scratch blocks is another block programming language developed at MIT which is originally forked from blockly.
I have setup a sample project to illustrate this integration on github here. This contains a starter-project and a final-project. The starter-project is without integration and the final-project is with the integration. You can follow the commit done in final-project which shows all the changes needed for the integration. Demo of the project after integration is hosted here.